
Friday, 20 May 2016
HGIBO 1/144 Gundam Astaroth Quick build and review
Ok, I decided to pick this guy up from amiami.com since I had a shipment within the same month, and since shipping is nearly the same with or without Astaroth, I decided to go with it. This won't be a formal review like I did before since I was building this in my rented house. So I will just do a quick review of this and show you the basics and details of the kit. I will not be using the sticker provided with this kit except for the eyes as I think I might have plans for this kit.

WIP custom abyss gundam update
Some minor updates on my custom abyss gundam, Already sprayed most of the joint and cannon parts with some Mr.Hobby Dark Grey (2). Decided to add a bit of mettalic parts on abyss' gundam binder cannons. I drill a bit on the end of the cannons to widen up the hole to make sure the metallic parts could fit in. It worked out perfectly fine without the need to use super glue for me to secure the metallic parts. A pretty simple mod but yeah I'm kinda of a newbie when it comes to modding stuff and adding metallic parts.
 Pics of it before being assembled, I forgot to take the picture of before and after the hole widening on the barrels. But it's pretty easy for you to widen it if you know the size of the metallic part's peg end.
 And here is the pic of it after insertion. Turned out quite nice than I thought. Probably will removed these and insert them again after I topcoat the barrel's with matte clearcoat.


Wednesday, 4 May 2016
Slight update on current progress
So, haven't been touching much gunpla lately due to work again, So far it's just been priming the parts then checking for defects for the past 3 weeks really, but most of the mods seem to end up being fine, the only hard part is masking and painting each part. Also decided to go to a weekend flea market to see if there are any old or rare to find kits and sure enough there were at least a few that piqued my interest. They weren't necessary buys but I couldn't resist the urge to get them since they were there in a pair.

Yup, pretty much the main parts are primed and ready to paint. Just the head is giving me some slight scratch marks here and there. Still need to restock primer before finishing this up. Seam lines so far aren't apparent in the large parts and mostly left are in the shoulders which shouldn't be a problem with slight putty if need be.

Yeah, I found these guys in a second hand shop selling for like RM15 each, color swap was intentional I guess or the previous owner decided to do so. Since both of them were there I just couldn't help it. They're pretty much in good shape, don't see nothing broken except for the mercurius' defensor bits being loose but that could be fixed and also a rigid hose for Vayaete's cannon to it's generator missing. I am still unsure if I want to restore them completely with a painted build or decided to kitbash both of them into one unit. I have another vayaete in storage and an unbuilt HG Serpent. I could probably use them for thought.

Yup, pretty much the main parts are primed and ready to paint. Just the head is giving me some slight scratch marks here and there. Still need to restock primer before finishing this up. Seam lines so far aren't apparent in the large parts and mostly left are in the shoulders which shouldn't be a problem with slight putty if need be.

Monday, 11 April 2016
1/144 Abyss gundam Custom Build temporary build up
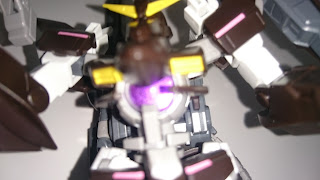
Well, here's a slight view of the the Abyss Gundam kit I'm working on for the Mid year challenge which I have around less than one month for it to be completed. Still need to fix up some seem lines, smooth-en some putty application around the legs and the feet. I also need to do some more detailing a bit. Don't want to overdo it in case I might make irreversible mistakes. I mostly have time for kits on weekends only and IF I'm not working during those times so progress is actually kinda slow for it being only a HG kit. These pics were taken before my WIP #2 post came up so you'd notice some of the items I posted on that post aren't visible yet in here. So far I haven't actually transformed it into MA mode yet but I don't think it would pose a problem for the body, only the side skirts and the legs I guess. The kit was slightly flimsy while I took these pics since I assembled it loosely and then proceeded with repairing it more. So far among what I've built in the years of building gunpla, this is actually the most heaviest mod I ever did on a kit.
 I guess the feet looks a bit elongated from this point of view but rest assured the size isn't that big than I thought it would be since the Hazel kits were slightly smaller than your average HG kits.
 The back cannons aren't completed by this stage so I didn't get to see if it was back heavy yet after installing the epyon shield and heat whip and also an amount of putty to secure it to the original abyss gundam backpack. Legs seems to be slightly off but maybe that because of me assembling the legs loosely so it isn't standing on the same level as the other leg.
I also decided to leave the forearms alone and not do any extra item installing, just only deepen some panel lines for the elbow guard so it won't hinder with MA transformation. I tried using other forearms from other kits and the size and bulkiness of them doesn't seem to slot into the shoulder binders nicely.


I also decided to leave the forearms alone and not do any extra item installing, just only deepen some panel lines for the elbow guard so it won't hinder with MA transformation. I tried using other forearms from other kits and the size and bulkiness of them doesn't seem to slot into the shoulder binders nicely.
Saturday, 9 April 2016
1/144 Abyss Gundam custom build WIP #2
Hey guys, It's been awhile since I last updated my blog, haven't been doing much of gunpla recently. Just an update on my Abyss Gundam custom build. Added some stuff, did more putty cleaning, added some plaplates and panel scribing for detail. Just some minor additions to fill in gaps and and also added some stuff to give more details.


For the backfeet, I had to add some plaplates to fill in the gaps around
the original abyss feet. Then I added some putty to clean up the
seamlines that seem to be stubborn and hard to remove using your
standard mr.cement technique. All that's left is just to sand and prime
for inspection.
Wednesday, 23 March 2016
1/144 Abyss Gundam custom build WIP #1
Okay so here is it is my first custom build for the year 2016. Had this old abyss kit a few years back and did well a pretty much cheap paint job on it ( Let's forget about this shall we?). So I decided to do a slightly more customized build of Abyss gundam using pla plates and also parts from other kits that I considered scrap parts. Still need to refine them more. Truth be told this is actually my first time in doing this kind of mods so Guess I'll be going with the flow I guess. I pretty much got the inspiration of doing this kind of build based on the SEED destiny R of the forbidden, raider and calamity gundams. I figured why not do these kind of mod on the new gens. Haven't really decided a new yet for this but lets get straight to the pics right?
For the leg parts, I added an extra thruster vent on the sides of the legs. Not finalized yet as the plaplate is kinda thin to be a wall so I really need to thicken it up with more plates. Overall, I'm quite satisfied with it, just need to smooth out the putty there. Probably need to add more slight panel lines.


For the leg parts, I added an extra thruster vent on the sides of the legs. Not finalized yet as the plaplate is kinda thin to be a wall so I really need to thicken it up with more plates. Overall, I'm quite satisfied with it, just need to smooth out the putty there. Probably need to add more slight panel lines.


Monday, 14 March 2016
1/144 Gaogaigar with dividing driver painted build
Well, finally finished painting this bad boy during the weekend, made a little color adjustment for gaoleon head and I have to say I am quite satisfied with the result. This kit was intended to be a birthday give for a best friend. Was kinda hasty to give it to him since the deadline was around the corner, or else I would have made more detailed shots. anyway here it is for you guys viewing , hope you enjoy it. Didn't do much in detailing since this kit wasn't intended to have them.


Tuesday, 8 March 2016
1/144 GaoGaiGar with dividing driver review
Alright, after a brief and quick assembly, here is the review for the 1/144 Gaogaigar kit with dividing driver from Aoshima company. I have to say this kit is quite ok for being a 10+ year old kit I presume. Sure you need to do a full paint probably to get it anime accurate. This kit also kinda suffers a lot in the polycap department. For starters, the ball joints for the head and the lion head parts are really small and also seems easy for it to fall off especially the head. A slight touch and it falls off. Chest part also suffers from it being heavy on one side if you decided to touch it a bit. In terms of it being back heavy, it does but if you know how to balance it, it won't be a problem. like I said the only part you'd need to be careful is the chest part. There are 2 fun gimmicks that should have been used in toys and not model kits but it's all up to you if you intend to use it. Construction of this kit really beings an old nostalgic feeling of building old kits like the 1/144 gundam wing kits. In terms of panel lining, there's not much to it in this kit, mostly on the thighs and the backpack, and if you've watched this anime, I don't think it's necessarily.


Monday, 7 March 2016
1/144 GaoGaiGar with dividing driver kit unboxing.
It's been awhile since my last blog post since I've been busy with work and all. So I will try to at least post something weekly. Anyway here's my unboxing for the 1/144 GaoGaiGar with dividing driver kit from Aoshima. It's a pretty old kit, So you can expect really old style polycaps, incorrect colors for the parts and also lose joints. One thing this kit doesn't come with are stickers. Yes this kit doesn't come with stickers, so you will have to do minor painting for the eyes and also other parts. One thing that I am quite glad with this kit is the parts seperation. Fro mthe looks of it, not much masking might be needed if you intend to do a full paint job for this. Only the lion head part, the shoulder trains and the stealth fighter for the red linings. And from the look of the box, this kit is pretty big for the 1/144, might even be big against a MG or a NG 1/100. Anyway let's look at the runners and see what we can expect.


 |
| Box is pretty big for a 1/144. Could be as big as the Kshatriya. |
Wednesday, 24 February 2016
HG 1/144 Gundam Throne Eins review
So here's my next review, and this is for the HG 1/144 Gundam Throne Eins, one of the three season 1 throne series that seem to be the least lackluster kits from the whole season 1 kits from my point of view. A cool looking kit, but it's articulation gets hinder by the armor parts and the equipment it carries. But nonetheless it performs in showing it's only few equipment worth mentioning. This will be a short review due to it not showing anything promising much . Stickers on this kit is just horrible except for the metallic purple parts for the chest. It has a very unique leg design as it doesn't look like it's standing straight but in fact it is.
 Articulation wise, elbow joints move around roughly above 90 degrees. The knee joints also go around above 90 degrees even though it has a double knee joint.

 The beam gun/crossbow has a very interesting look to it. As I said it has 2 horrible folding stickers to be put on the small wings there. Not that a little paint touch up won't help fix that. It has a movable docking stand for the giant GN cannon on it's back. The docking mechanism can be installed but you will need at least some adjustment for the giant cannon and the arm positioning for it to dock well.


There's 2 joints for you to swivel the GN cannon and the cannon is installed by a ball joint for movement. As you can see this cannon is huge, and if measured by height this would probably be nearly as tall as a MG kit.


 You also get 2 beams sabers to be put on the shoulder mounts, although no beam effect parts are included. The best way is to use any beam saber effect with a rectangular peg instead of a standard round one.

The only sticker worth using is this,the chest sticker. it pretty much pops out when it's surrounded by all the dark colors.
So the verdict of this kit, I would say pretty much buy this if you are interested in it, but for those try and avoid this, there's pretty much other kits that show off being a long range type better than this one although you will be missing that very nice cannon. There's not much pose you can do with this kit other than having it pose with the GN cannon deployed since that is the main focus of this kit. pretty much that GN cannon would be a good addition to any kitbash or custom build that you have in mind.


There's 2 joints for you to swivel the GN cannon and the cannon is installed by a ball joint for movement. As you can see this cannon is huge, and if measured by height this would probably be nearly as tall as a MG kit.


The only sticker worth using is this,the chest sticker. it pretty much pops out when it's surrounded by all the dark colors.

So the verdict of this kit, I would say pretty much buy this if you are interested in it, but for those try and avoid this, there's pretty much other kits that show off being a long range type better than this one although you will be missing that very nice cannon. There's not much pose you can do with this kit other than having it pose with the GN cannon deployed since that is the main focus of this kit. pretty much that GN cannon would be a good addition to any kitbash or custom build that you have in mind.
Monday, 15 February 2016
HGUC 1/144 GUNDAM F91 GUNDAM (HARRISON CUSTOM)
So uhh, here it is, my review of the HGUC 1/144 F91 gundam ( harrison custom) review. It's been awhile since I've updated this blog and I'd like to begin my review with this neat little kit. Construction wise, it's kinda different than your different 1/144 construction. It actually feels like a new series build even though it's from a UC series line. Construction wise most of the torso, and leg parts consists of small parts mostly. Sticker wise, THIS kit has a bunch of stickers mainly everything in yellow except for the yellow parts of the feet. And the downside of these stickers, every sticker requires to be folded and be overlaid together. So if you're not painting this, these stickers will absolutely start peeling itself overtime. Articulation wise, it's much more articulate than your standard 1/144 and can even be compared itself as close to RG articulation I think. Equipments for these items, I'd say I am impressed, since most of these equipment can be equipped into suit itself. I will give a detail explanation with pictures.


Friday, 5 February 2016
HGUC 1/144 GUNDAM F91 WIP
Sorry haven't been updating the blog for awhile, I've been busy with work. F91 and throne Eins review should be up within the chinese new year leave and also other stuff. Slight update today for those who are building or intend to build any version of the F91. The kit's rifle handle can be seperated from the original rifle to have it move. Seen a few reviewers unaware of this so it'll be nice for you guys to know.

 |
| You can snip these of and sand them not too much and test it out until you feel fine about it |
Thursday, 28 January 2016
HGUC 1/144 Gundam F91 (Harrison custom) UNBOXING
So here is my first unboxing of the gundam F91 Harrison Martin custom kit. I've been holding back from buying this kit ever since it was released since there were other kits that got my attention.I went with this version instead of the original due to the fact that this one seems nicer with the colors, although the problem lies with the sticker sheet. So here some images of the unboxing showing the runners and manual.
 |
| Box art along side the release HGUC 1/144 Crossbone gundam X1 |
Wednesday, 27 January 2016
HG 1/144 Gundam Throne Eins unboxing
Today I will be doing another unboxing post and this time is for the HG 1/144 Gundam Throne Eins from the Gundam OO series line. This is the first of the three gundam Thrones released for the first season of gundam OO. This unit is the leader unit of team Trinity and piloted by Johan trinity, sadly gets killed at the end of season 1. This kit is a very interesting kit in terms of the main color scheme which is mainly sort of a Dark red brownish color which you will rarely see in most gunpla kits. Out of the 4 kits released under the throne series, yes this includes Arche gundam, Throne Eins for me seems to have most of the gimmick and pose ability value than the rest which vastly comes from the GN launcher it's equipped with. So let's get straight to the runner and manual review


Tuesday, 26 January 2016
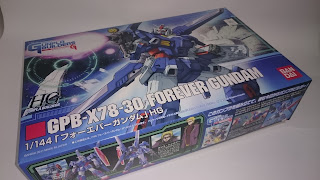
1/144 HG Forever gundam unboxing
Today I'll be doing an unboxing of the HG 1/144 HG Forever gundam from the Gunpla builders beginning G OVA series. This kit mainly consists of the original RX-78-2 gundam 30th anniversary edition with added runners for the forever gundam parts. So you'll mostly be having quite a lot of extra parts from this kit. And yes you can build the original gundam if you wanted to. I will not be doing a review of this kit since I will be giving away to a friend of mine. So let's get to the picture of the runners and I'll give a rundown of each runner I guess.

Sunday, 24 January 2016
Barbatos updates
Some updates on the Barbatos custom build. Finished with painting the major parts. Just need to assemble and do a few posing actions after its been fully assembled. I am still building the lance weapon that comes with the first IBO weapon set just to build thi custom kit, and I haven't actually thought of naming this yet.
 Fully assemble the torso, which I somehow prefer to build this first in any gunpla kit. Must be some weird fetish I guess.

 Both legs are done. Just left minor details to paint.
 Due to them being stickers originally, I just decided to paint it metallic purple on the leg armor parts.


Hand painted the A insignia on the shoulder and the left knee

 Pretty much now I just need to snap it up and take a few shots for the blog later on.


 |
| After fully assembling the torso armor. |
Hand painted the A insignia on the shoulder and the left knee


Saturday, 23 January 2016
First Custom build in the Blog
Well for my first not so much custom build, here are a few additions I did on the recently released HG IBO 1/144 Gundam Barbatos. didn't went into much detail modding because I was already brainstorming on this years GBWC 2016 entry which I will be participating again.
Added some Plaplates on the front skirts to make it a little bit longer than it originally was. Turned out as what I was expecting.

Added some plaplates on the shins since it was looking quite bland to begin with. Also did a few panel scribing which I'm still trying to get used to it. I didn't took a picture of this but I also added some putty to bury the A symbol on the right knee.


Added extra plaplates to extend the should part downwards.

 Had to grind the holder of the armor Schneider to have it fit with Barbatos' hands.
Added some Plaplates on the front skirts to make it a little bit longer than it originally was. Turned out as what I was expecting.

Added some plaplates on the shins since it was looking quite bland to begin with. Also did a few panel scribing which I'm still trying to get used to it. I didn't took a picture of this but I also added some putty to bury the A symbol on the right knee.


Added extra plaplates to extend the should part downwards.

For the right leg where i removed the A insignia on the knee, I created a knife holster to be used with an armor Schneider from a NG 1/100 Gale Strike and stick it over the knee area. I also added plaplates on the side skirts to make it feel that it has more something on the sides of the legs.


Subscribe to:
Comments (Atom)